Oh man, I am so proud of myself!! I did a DIY project all by myself today!!!!!!!! Usually I let Doug handle all of the projects because he's particular about how they're done. I wouldn't exactly say bossy, highly critical, and a perfectionist. Just particular. (
and those other things too). However, I really wanted to do this project and I knew Doug didn't feel it was a priority. He's wrong. Mason Jar Soap Dispensers, are a priority. A top priority.
It was so satisfying doing this on my own! Knowing I could do it on my own. The hardest parts were: the math. Those mason jar lids are not a nice even measurement. I called Doug for math help. But that was all. I didn't ask him for help in any other way. The other hard part was sawing the tops off the original soap dispenser. Yowser! I was sweating like a maniac. Of course- there is a heat index of 103 here in North Carolina, and I was in the garage, with the door shut. I would have sweat no matter what.
Here's the tutorial that I found, and followed the directions. It was so easy!
http://www.prettyhandygirl.com/make-a-mason-jar-foaming-soap-pump/
I did a couple of things differently than she did, here are a few of my step by step pictures.
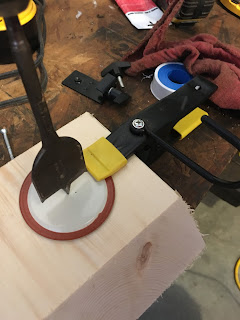 |
| One thing I did differently- I clamped my lid down. Thanks Doug for that tip. Otherwise that thing would have spun all over the place. |
 |
| What a smooth, nice cut! |
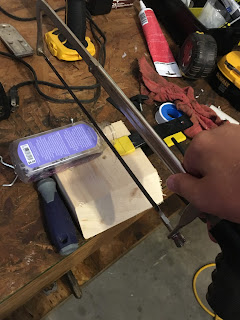 |
| She used a utility knife to cut the top off of her original soap container. I used a hacksaw. There was NO way that utility knife was going to "cut it." (hahaha see what I did there?) |
 |
| Finished product. I took the top I sawed off, and stuck it up through the bottom of the mason jar lid, and then screwed the soap dispenser to it. I've seen other tutorials that did all kinds of crazy stuff with adhesives and junk. I didn't want to get into all that. |
 |
| I got all 4 done in about 30 minutes. |


Comments
Post a Comment